Your Guide For Marketing Technology and Automation

Using Eloqua Custom Object Record Services

Eloqua Custom Objects Record Services

If, like many users of Eloqua, you wanted to know the way to update an Eloqua Contact field record with a field that was captured in a Custom Object record then this tutorial is for you. This, any many other tasks, can be accomplished using Eloqua’s “Custom Object Record Services”.

Scenario: let’s assume that you have a Custom Object in Eloqua that is being pulled from a third party system. In that Custom Object, one of the fields is Company and you would like that field to be written to the actual Company field in the Contact table. You can accomplish this goal by using Custom Object Record Services.

First, go to your Custom Object in Eloqua and from the upper right menu that says “Custom Object” select the dropdown arrow and select “Custom Object Record Services” as shown on the below screenshot.

Eloqua Custom Object Record Services

That will open the Custom Object Services Manage Services window. In that window you will see two options: New Data and Modified Data. In our example, if you only want the Company name to write to the contact record if it is a new addition to Custom Object then you would select the drop down arrow next to New Data and select Edit Service Actions. If you want the Company name to write to the contact record only if the existing data in the Custom Object was modified then you select the Modified Data option. If you want it to run for both new and modified data then you would have to do each of them. For our example we will just do the New Data option.

Eloqua Custom Object Services

Since this is the first time we are applying a service on this custom object the next screen you see look pretty blank since there are no existing services. On this screen you just simply click the “Add to Processing Steps” button.

The next screen, as shown below, is where you select which Custom Object Record Service you would like to run and you give it a description. In our case we are going to choose “Save to Contact Table” and write the description Save Company to Contact Table. Once we add that we just click the “Add” button in the bottom right.

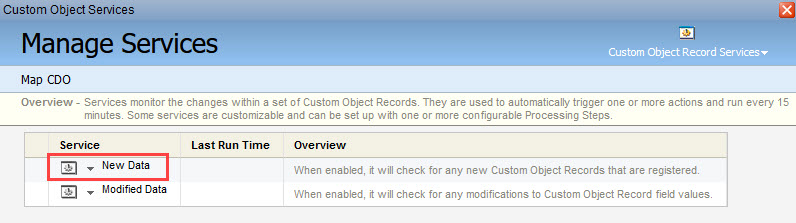
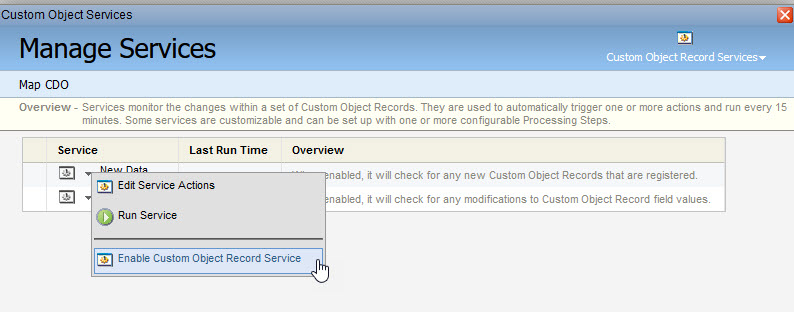
The next window is where we define for the Company field in the Custom Object to be written to the Company field on the contact record. First, in the required parameters section we have the Email Address field in the custom object map to the Email Address field on the contact table. For Contact Type you can keep it at Constant and Regular Contact and for Overwrite Existing you can keep it at Constant and Yes.

In the Optional Parameters section we define that we want the Company field in the Custom Object to write to the Company field on the contact record by making each of those values Company. If you wanted to add more fields to write to the contact record you simply choose the field from the Append an optional parameter drop down and click Append and then choose the field on the custom object to write to that field.

The last part of this window allows you to set conditions on when this filed should be written to the contact table field. In our example we will just select Always. Once you are done making all the changes as shown below you can just click the Save and Close button. 

Eloqua custom object record services

Once you hit Save and Close from above it will take you back to the the prior screen. To turn this new custom object record services on though Eloqua is a little wonky and often you have to actually close out of all the Custom Object Record Services windows and go back to your custom object (see first image of this article) and then once again go to the Custom Object dropdown arrow in the upper right of the screen and select Custom Object Record Services again. This in effect “reloads” your created services. However, at this point your newly create record service is set up but not activated. To activate it you have to click the drop down arrow next to where it says New Data and select the “Enable Custom Object Record Services”. 

Eloqua Custom Object Record Services

To test all of this you can simply go to your Custom Object and from the Custom Object dropdown arrow in the upper right select New Custom Object Record. On that window you then just enter a new record as shown in the below example and click Save and Close.

The Custom Object Record Services just runs every 15 minutes so after that amount of time if you go to that same contact in your Eloqua contacts you should see that the Company name that was in the Custom Object is now also on the Company field in the contact record.

That is it – you are all set and this will just continue to run every 15 minutes unless you disable it. Good luck!

NEWS    ———————————
Create A Cookie Consent Form For Your Website
MarTech

Create A Cookie Consent Form For Your Website

Understanding Cookie Consent Forms on Websites: Balancing Privacy and User Experience In today’s digital landscape, where the internet plays an

Reduce Zapier Task Usage With Code By Zapier
Eloqua

Reduce Zapier Task Usage With Code By Zapier

Reduce Zapier Task Usage Zapier, a powerful automation tool, allows individuals and businesses to connect different apps and create automated

POPULAR PRODUCTS  ——————

Leave a Reply

About MarTech Hero

MarTechHero.com is your source to find out info on Marketing Technology with an emphasis on using Eloqua for your marketing automation.

Scroll to top